Posted on

Flower Bud Earrings Tutorial

My brand new Flower Bud Earrings Tutorial is finished and available for instant download here
This is the first of my tutorials I have classified as “metalwork” as it didn’t quite qualify for wirework as we start with sheet metal.  As an added bonus I talk about how to make your own ball-head pins using a butane torch.  I’ve come to realize that I can do most of my soldering projects with this little guy while my oxy-acetylene outfit now sits, unloved, in the shed.  Figures.  We aren’t soldering in this project, however; it involves cold connections and these little flower buds actually aren’t that difficult to make.  And with silver passing the $40 mark I am trying to tastefully incorporate some alternative metals like copper and brass.
Happy Spring, y’all!
Posted on 1 Comment

Helping Haitian Angels

I like to share when I have a project that touches my heart.  This time it was for a woman named Debbie who, with her husband, started an orphanage in Haiti that has helped save the lives of countless children since it opened in 2008. Watching this informational video absolutely brought me to tears, and I am so proud of the work they are doing.

Debbie commissioned me to make special thank-you gifts for the volunteers who have traveled multiple times to Haiti to help out with the orphanage.  Together we designed these pendants (with angel wing charms) for the ladies and keychains for the guys that read the name of the orphanage, Helping Hatian Angels.

Posted on

Spring is here

Hi, gang!  It’s been a busy spring here in my studio, on account of the miserable weather we’ve had.  A new collection of pieces is looking happy at the shop downtown

I’ve also been able to work on some other projects like…

…the PMC Round Box Pendant tutorial!  It is a pretty simple and straightforward design, but I take you through step-by-step with little tips on things to look out for along the way.  I also show you how to modify the design to make your own resin blanks. 

This is a snippet from a map of Gothenburg, Sweden, in case you’re wondering.

More tutorials are in the works!  See that pair of flower bud earrings up there?  Hint, hint.

Posted on

A little background

I go back and forth wanting to keep the background of my jewelry photos neutral and consistent, and then getting bored with that and wanting to use props.  Lately I’ve found some fun things with which to give my new pieces some company in photos.

Slate (flagstone?) from our patio

Old books, salvaged architectural elements
I love how this rusty metal sets off the white and shiny silver in this bracelet

Posted on

Playing with Polymer

People often ask me how long I’ve been making jewelry, which usually requires a follow-up question like, “How long have I been making jewelry like I make now?” 


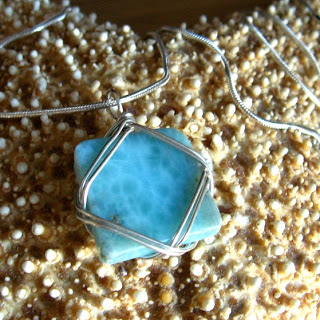
You see, when I was a kid my parents wouldn’t let me get my ears pierced, so naturally I was fixated on what I couldn’t have. Using my dad’s tools I would bend telephone wire, gleaned from a construction site, into little clip-on earrings.  I had turquoise ones and yellow ones and I didn’t care how ugly or dirty they were.  Later I found some kidney-wire earrings at a craft store and clipped them upside-down to my lobes because it looked like the end of the wire was going into my ear like a real earring.  Hot stuff!  Add to the mix my great aunt, who mined and polished her own stones and got me interested in rock tumbling, and I was a full-on jewelry nerd.  I got really good at wire-wrapping those slippery tumbled stones to make pendants, though, so now wrapping sea glass is second nature. My friend Jenny, whom I’ve known since 6th grade, recently asked me to wire-wrap this piece of larimar, and (kindly) noted that I’ve come a long way since my rock tumbling days. 


What were we talking about?  Oh yeah, polymer clay.  Also during my middle school years I got a sampler pack of Cernit clay at a train show (my Dad is into model trains).  Soon I got into polymer clay (sounds like I’m dabbling in drugs) and would read Nan Roche’s The New Clay like it was my job.  I worked with polymer clay on into high school and thought it was really cool to make earrings as miniature versions of the designs in special outfits.  That’s when I got started with beads, too, back before internet shopping.  So when I say I’ve been making jewelry since I was a kid, my products back then are not what I consider lovely today.  I haven’t any examples to show you, although my mother still wears her vintage AnneMade Jewelry to my chagrin.
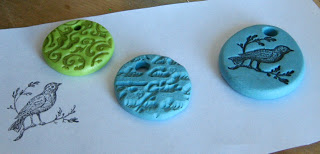
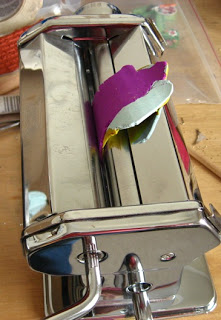
These days (meaning now that I have a jewelry business) after I have a chance to recover from the holiday season of making and selling jewelry and all our Christmas festivities, it’s usually the dead of winter and I get a yearning for spring.  I do have to work ahead of the season, so it’s not unusual for me to use delicate pastels and beachy brights at this time of year.  I’ve been itching to play with polymer clay again and make some pendants for spring.  And I love that my original sampler pack of Sculpey is still as good as it was 20 years ago.  Polymer clay has come a long way since then, including the development  stronger formulas, liquid clay, and surface techniques like mica shift.  I have always been too cheap to invest in a pasta machine, but today I realized that hand-kneading clay takes forever. 
(I think it’s funny that my clay turned out the same color as the shopping list I created while kneading it. Love this color!)  So yesterday I printed out a Michael’s coupon and headed there as soon as Olivia woke up from her nap. I also found treasures in the stamping aisle (alcohol inks to color liquid Sculpey, dye ink pads for rubber stamping, clear stamps so you can see what you’re doing).  And what a difference the pasta machine makes!  It’s like a mini rolling mill, in fact I could run texture through with the clay.  Once I knead the clay to get it soft, mixing colors on the machine is so easy.  And after working with PMC so much, it’s so great not to have to worry about a piece drying out on me.  If I don’t like it I just ball it up and try again.  I do have to worry about foreign particles, though, because I’m not firing this clay in a kiln like PMC.  (Side note: PMC people, if you’re looking for Teflon paper to use as a work surface, Michaels has it in the stamp/ink aisle.)

Another creative chapter in my past is painting.  If you come to my house I may not point them out, but several of the pictures on our walls are watercolors and drawings I did in high school.  And if you’ve ever worked with oil paint (or acrylic) you’ll know the concept of color saturation.  A tiny dab of alizarin crimson or titanium white is all it takes to affect the whole glob of paint because those colors are so saturated.  Same goes with certain colors of polymer clay, so if you’re just starting out remember to mix in only a little bit of a new color at a time.
I view the Pantone season forecast a little like I view the Farmer’s Almanac.  Does anyone ever look back and grade them on how accurate they were, or do we just trust them?  I live in a small town out in the country, so we’re a little behind the style trends anyway, so I tend to just use what I like.  Right now it’s orchid.

Did it again! This ballet pink pendant matched another Post-It. Maybe I need to get my fashion forecast from 3M.


Posted on 2 Comments

Resinating

Auntie’s Beads recently contacted me to try some of their products in exchange for telling all of you wonderful people about them.  Lately I’ve been yearning to try some more resin projects, so I chose several of their glue-in-and-glaze charms on this page.  They are plated instead of solid precious metal, which means they are a bargain and yet have a nice weight to them.


One of the other resin blanks I used during this round of resin is one I made from scraps of PMC.  It has French script on the back and I traced around it on rice paper to get the right size of insert.  Another option is to use a paper punch if you’re using calibrated bezel cups.  Or, Auntie’s Beads offers a template card for sale so you don’t have to guess while cutting a paper for, say, the oval glue-in-and-glaze charms. 
I was more interested in getting the project finished than I was in the aesthetics of each piece, but I did try including some seed beads and a sprinkling of fine glitter.  On our trip to Savannah I found an awesome art supply store and picked up some Japanese decorative paper, so I inculded some of that as well. 
The charms from Auntie’s Beads are pretty shallow, so there’s not a lot of room in the well to hold 3-dimensional found objects, but it also means it won’t use up a lot of resin volume like the die-cut bezel cup pictured here.  If you’re just using decorative paper or photographs, they would work great.  Another benefit of the glue-in-and-glaze charms is that they come as links, ready to make into jewelry when the resin dries.  For these sterling bezel cups I have to solder on rings, and that’s just a pain.
I use Colores doming resin from Rio Grande, which is a two-part non-yellowing epoxy with a long open time so you can mess around with your design before it cures. Resin is all the rage in Jewelry World right now and next I think I want to try UV resin.  No careful mixing, no waiting all night for it to cure.  It costs more, but considering I’ve used about half an ounce of the huge bottles I have, that shouldn’t be a big deal.
I liked how the charms from Auntie’s Beads turned out.  Like I said, they are inexpensive and have a nice weight to them, and they have rings attached so these are all ready to link into a design.


Steampunk is another trend right now in Jewelry World, and in some of these pieces I included some watch gears I found on eBay years ago. 
I also have some decorative brads from the scrapbook aisle that are in the shape of keyholes, but they are hollow and lightweight so I thought they would be good candidates for resin. 
I snipped off the brad parts and, since they have holes already, stuck them to a piece of packing tape so the resin wouldn’t leak out.  And because their holes are now closed I drilled through the resin with my Dremel in order to link these components to other things.  I could have placed brass tubing for the holes and “resin’ed” around it, but it seemed like a hassle to keep things from moving around with wet epoxy in the equation.  My only complaint about the tape-back method is that it gave sort of a matte finish on the back instead of the shiny clear on the top side.
Posted on

Puffy Hearts

I just delivered a group of Puffy Heart necklaces to the shop downtown.  I weave these together from 73 Swarovski crystals and they are perfect for Valentine’s season or just to add a little bling to an otherwise plain outfit.  I am in love with the top color, Indian Pink 2XAB, an orangey pink with two coatings of Aurora Borealis, or AB.  Basically, gold is held in a flame and the resulting fumes land on the surface of the crystal to make a shimmery rainbow coating.  Clockwise the colors are Indian Pink 2XAB, Light Siam AB, Indian Pink AB, Fuchsia AB (bottom), Rose AB, Crystal AB (off to the left), and Siam AB, with Cyclamen AB in the center.

These take some time to make and I still have to follow the tutorial, but it is fun to see it puff out on the final step, and they are so sparkly in person.  I brought packs of crystals, a spool of illusion cord, and nail clippers with me on vacation last week so I could make hearts on our day at sea or in the airport.  (My husband snapped this shot of me in our stateroom.  The bracelet is by Hope Gibson, a fantastic lampworker I met in St. Croix.) 

My tutorial for the Puffy Heart Pendant is available for download here if you want to give it a go, or you can email me if you want to order a puffy heart in any color ($49 with chain).   Happy Valentine’s Day, y’all!

Posted on

I love my job

I just want to say THANK YOU to my customers, friends, and family who have helped make 2010 another great year for AnneMade Jewelry.  It never ceases to amaze, tickle, and humble me that something so fun can also be successful.  
I give a huge amount of credit to Simply Charming Boutique, the only place you can see and hold and try on my creations in person.  Brenda Adams and her team have created a fabulous place for women in Winchester to shop for all kinds of jewelry and fun gifts like monogrammed umbrellas, cowboy rain boots, and Vera Bradley. 
Happy new year!